I have received a lot of questions about the way that I record my songs and how I get the sound that I have so I decided to show you how I generally record my songs with a little riff. I am not going to explain how I create my actual guitar sound because you can read about that in the Tones section, but rather how I record mix and master the songs. Neither am I going to explain how GarageBand or EzDrummer works because not everyone uses these applications and you can always read the manual or consult the help if you want to learn more about the different features.


I am going to go over the following steps in this ‘guide’:
- Programming drums
- Recording and adding effects
- Mixing
- Mastering
First of all some general things. I made this guide to show people how I record at home and help other musicians record their songs. I’m not saying that this the right or the best way of recording, it’s just how I do things and what works for me.
Before we start let me explain some technical and important things about compression and panning of the mix, since we will need to use both of these things for each track.
Compression is a very, very important part in the mixing process. What compression basically does is make loud noises softer and soft noises louder. The result is that your mix sounds smoother and it evens out your instruments to make it all blend together nicely. I’ll show you an example of how important compression is by posting the final mix with and without compression.
Another thing you want to think about when mixing is panning. Try to pan all the instruments as if you were in the audience at a concert and think about where the different instruments are on stage. For example, the drummer is usually in the center together with the bass player and the guitarists are positioned around 10 and 2 ‘o clock. You need to do the same thing with your recording to get a nice stereo mix. I’ll explain which panning settings I used for what instruments in this guide.
That’s enough for now, it’s time to start recording!
Drums
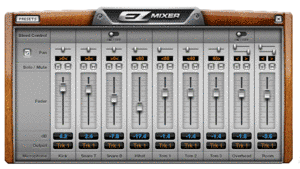
The very first thing that I do after creating a new project is make a new software drum track. I set the instrument to EzDrummer and I recall the mixing preset that I use. In the picture on the right you can see the mixing settings that I use for EzDrummer. Now it’s time to create the actual drums. I always start programming the drums after I figure out the song and made a guitar tab so I know the structure of the song and how I want it to sound. Normally I use a standard drum pattern and modify it myself, but I also use fills and patterns from Toontrack.
After the mixing is done it’s time to add some effects to make the drums sound more punchy. First of all I add compression. I always use the GarageBand preset ‘Drum Kit Tighten’ because it gives a really nice punchy and tight sound. The compression settings of this preset are:Threshold: -23.0 dB
Ratio: 1.4:1
Attack: 3.0 ms
Output: 7.5 dB
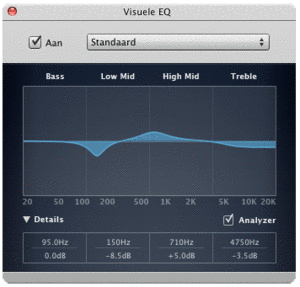
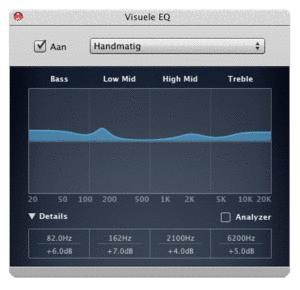 I also add some EQ to boost the snare and bass sounds and give the overall sound more treble. You can see what equalizer settings I use in the picture to the left. The final effects that I use for my drum sound are reverb and delay. I use very little delay, but just enough to make it sound a bit more spacious. Next I add quite a lot of reverb to create a big drum sound. Try not to overuse it though, because then you will end up with undefined and messy sounding drums. I use various reverb and delay settings for different songs and you should try what works best for you.
I didn’t use any panning in GarageBand because EzDrummer itself has a very advanced mixer. You can see the exact panning settings that I used in the mixing screen that I referred to earlier on. Just make sure the bass and the snare are in the center. Cymbals are panned to the sides just like the toms.
I have received a lot of questions about the way that I record my songs and how I get the sound that I have so I decided to show you how I generally record my songs with a little riff. I am not going to explain how I create my actual guitar sound because you can read about that in the Tones section, but rather how I record mix and master the songs. Neither am I going to explain how GarageBand or EzDrummer works because not everyone uses these applications and you can always read the manual or consult the help if you want to learn more about the different features.
Bass
When the drums are all done I record the bass tracks for the song. I like to keep my bass sound heavy but simple so I barely use any effects. The only thing I add, besides the amp simulation from PodFarm, is compression. I don’t use any reverb or delay on the bass sound to keep it sounding as tight as possible. I also keep the bass in the center of the stereo spectrum to create a solid foundation. These are the compression settings that I use for the bass:
Threshold: -23.5 dB
Ratio: 2.2:1
Attack: 10.0 ms
Output: 4.0 dB
Guitars
Now that I have programmed the drums and recorded the bass it’s time to lay down the guitar tracks. I always record at least two rhythm tracks and lately I have been experimenting with three guitar tracks, which works really well in my opinion.
After I have created a new track in GarageBand I fire up PodFarm and choose the preset I want to use. You can download presets and read about how I create my sound in the Tones section. For this track I used the Rectumfrier preset based on the Mesa Dual Rectifier. Next I add some compression and reverb again. I use very little reverb, because I already added that to my tone in PodFarm. At last I pan the guitar track -48, to the left. By panning one rhythm track -48 and the other 48 you can create a nice stereo effect.
These specific panning settings seem to work especially well with the three rhythm tracks that I use to create a nice full sound. If you’re using double tracked rhythm guitars I would recommend panning the rhythm tracks -32 and 32.
And finally here are the compression settings that I’ve used:
Threshold: -5.0 dB
Ratio: 2.4:1
Attack: 71.0 ms
Output: 5.5 dB
When the first guitar track is done I create a new track with the exact same settings and same amp model as the first one and pan it 48 to the right. After that I play the same part as tight as possible to create a nice large stereo guitar sound.
As I’ve mentioned before I’ve been experimenting with three guitar tracks. I create another new guitar track with the exact same settings, but I use a different amp model. In this example I’ve used the JCM Hardrock model, which is based on the Marshall JCM-800. I keep this guitar track in the center and I mix it in very soft with the other instruments so that you can hear the effect, but it’s not too overwhelming.
Now I have recorded all the parts I need and created a basic riff. I have intentionally used a very basic example to keep everything simple, but I haven’t explained yet how to deal with clean, lead or acoustic guitars.
Clean and Lead guitars
For the clean and lead guitars I use the exact same settings in GarageBand as I did in this example. I just change the sounds in PodFarm. When I record clean guitar sounds I generally record two tracks and pan them the same way as I did with the first two distorted rhythm guitars in this project.
As I’ve said I use the same reverb, delay and compressor settings for the lead guitars as I do with the guitars in this example. Usually when I record a single track of lead guitar I keep it in the center of the sound spectrum. What I also like to do is duplicate the lead guitar track and pan one track -32 to the left and the other one 32 to the right. If you shift one of the tracks a few milliseconds you get a nice stereo sound. I don’t use that technique all the time though, it depends on how it sounds with the rest of the song.
Acoustic guitars
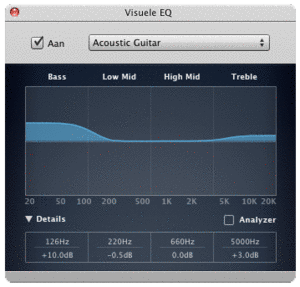
Recording acoustic and classical guitars is something totally different. I don’t use PodFarm and I barely use any effects because I want to preserve the characteristics of the acoustic guitar as much as possible. The only effects that I add to the signal coming directly from the acoustic guitar are compression, EQ, reverb and delay. In the picture on the right you can see what settings I use on the equalizer. I just add some bass and treble to make the guitar sound somewhat bigger. I use a little bit of delay and quite some reverb, depending on the song and how many instruments are being played at the same time. My compression settings for the acoustic guitar are:
Threshold: -13.5 dB
Ratio: 2.7:1
Attack: 6.0 ms
Output: 3.5 dB
Mixing
Now that the all the tracks are done it’s time to go over to mixing the tracks together. Unfortunately I have to tell you that there is no procedure for that. You just have to rely on your ears for mixing. A nice pair of speakers with a flat frequency response can really help with this, but still you have to decide yourself how loud you want each instrument in the mix.
Mastering
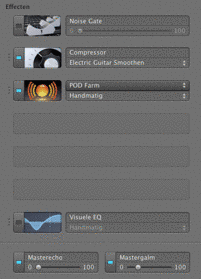
After I’m satisfied with the overall mix I have one last thing to do: mastering the song. Mastering can be very important for your how your song sounds. In the picture on the right you can see what effects are added to the master. As you can see I use a multiband compressor and an equalizer. With the equalizer I filter out annoying frequencies that make the sound too ‘boomy’ or shrill. You can check the settings of the EQ in the picture on the right.
The multiband compressor is very important for the overall mix. It has a really great impact on the sound, smoothens out the song and blends the instruments together. It’s hard to describe all the settings I use because the effect is quite complex. If you’re using a multiband compressor and the plugin offers some default presets I would advice you to try them all out and see which settings you like best for yourself. Trying out different effects and settings is the only way you will learn what effects and parameters influence the sound in a certain way. You can also just use a normal compressor on the master track, but it won’t have the same effect as the multiband compressor.
Now that the track is recorded, mixed and mastered, let me show you the result. In the beginning of this guide I said that I would make a track with and without compression to show you the importance of the effect, so here they are. You can check them out below.
In my opinion compression makes your overall mix sound a lot smoother. It seems to even out all the tracks and blend the different instruments together nicely. Also, by using a compressor I think that a lot of power and presence is added to the final mix. I believe that this is what makes your mix sound more professional and better altogether.
I hope this guide gave you a good impression of how I record and get my sound. If you have any questions about recording you can always send them to recording@csguitar89.com and I will try to answer as quick as possible. However, I can and will not answer questions that are specifically about software. I don’t know how all the different programs work, so you should take a look at the help or the manual of the application for those matters. Thanks for reading and good luck with the recording process!